
Herblore minigame
OSRS Mastering Mixology Guide
Learn the order loop, choose the right herbs, improve your XP per herb and spend your resin on the upgrades that matter most.
Short answer: start at 81 if you can wait, submit all three orders while learning, use a small paste batch first and buy Prescription goggles before the other permanent rewards.
Is it worth doing? For an Iron, yes: the goggles and amulet are worth getting even if you do not stay for every reward. For a main, play it for the untradeable upgrades or when the live paste cost makes the XP worthwhile. It is not the fastest route to 99.
Compare Mixology with normal training in the Herblore 1–99 guide. Use the Herblore Calculator when you want to compare normal potion methods and current prices.
Updated
Before the first order
Getting to Aldarin
The easiest first visit is the Mastering Mixology teleport in the Grouping menu, subject to its 20-minute cooldown. You need 60 Herblore and Children of the Sun to play.
If that teleport is on cooldown, use the quetzal to Aldarin once you have unlocked quetzal travel during Twilight’s Promise, then run north. Aldarin’s landing site is already built. With fairy rings unlocked during Fairytale II, use CKQ and run south-east. If you have neither travel network, take the 20-coin boat from Sunset Coast and walk south from the dock.
Enter the Alchemical Society building marked on the map, go downstairs and speak to Supervisor Lalo for the tutorial. The bank chest and refiner are in the south-east part of the facility; the workroom is through the opening to the west. Bring a small selection of clean herbs and leave room for three potions. You do not need combat gear or normal potion secondaries.

The images and clips below come from our own sessions. The RuneLite helper section explains the overlays you will see. Select a still image to enlarge it, or play a clip at normal or half speed to follow the clicks.
01 / Prepare your paste
Refine a small batch and load the hopper
- Requirement
- 60 Herblore, not boostable
- Quest
- Children of the Sun
- All potion bases
- 81 Herblore
- Hopper capacity
- 3,000 of each paste
- 1Refine herbs and put the paste in the hopper.
- 2Pull three levers and collect the potion base.
- 3Process each potion at its requested workstation.
- 4Hand the finished batch in at the conveyor belt.
Choose your supplies using the main account herb comparison or the Ironman herb advice. Withdraw unnoted clean herbs, then operate the refiner next to the bank chest. It also accepts the corresponding unfinished potions, so an existing stack of those can be used here.
One click lets the refiner work through your inventory. For faster preparation, click it once per game tick, roughly every 0.6 seconds. Each herb becomes stackable paste; the herb you feed in determines its colour and quantity.
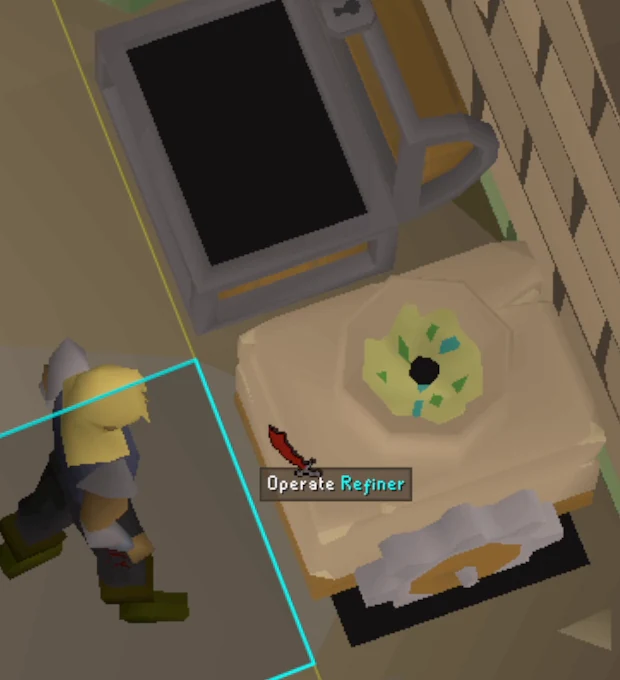
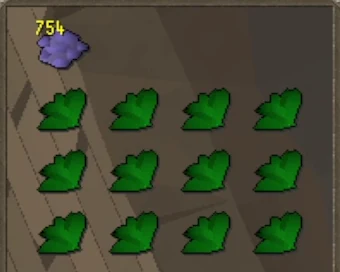
Deposit once to top up all three colours
Take the paste into the workroom and choose Deposit on the hopper behind the levers. It takes as much of each colour as will fit, up to 3,000 of each. Any excess stays in your inventory. You do not need to use the paste stacks on it one at a time.
The hopper in this clip is partly used, so one deposit brings its counts back to 3,000. The same action loads an empty hopper on your first visit. Paste left in your inventory does not feed the levers automatically; top up again when a colour runs low.
Paste is your supply; resin is your reward currency. Brewing spends paste from the hopper. Handing in potions earns resin, which stays on your account to spend in Lalo’s shop. The three counts under the orders show hopper paste, not the resin you can spend.
Do not refine the whole stack on your first visit. Make a small amount of each paste, learn which colours you use fastest, then top up. Paste cannot be traded or used outside Mixology.
02 / Optional RuneLite helper
Make the orders and timing cues easier to read
The helper shown here is Mastering Mixology by Hexagon. In RuneLite, open the plugin configuration panel, select the plug icon at its top right to open the Plugin Hub, then search for Mastering Mixology and install the entry by Hexagon.
Its short recipe codes save you reading the full potion names each round. Inventory Potion Tags labels your bottles, while the order list marks the requests you have finished as “done”.
Highlight stations points out a requested workstation for an unfinished potion in your inventory. It helps with the next processing step; still check the order icon when two requests use the same recipe.
Under Reward Tracking, choose your Selected Reward and enable Show Resin Bars. Here, Lye has the shortest bar for Prescription goggles. You need to fill all three bars to afford the reward.

What the coloured outlines mean
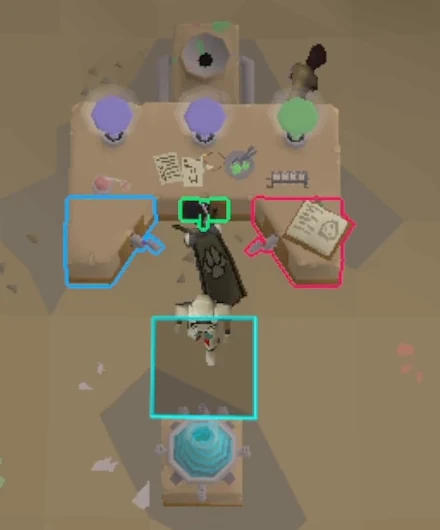
- Blue, green and pink levers: Highlight levers marks Mox, Aga and Lye respectively. These colours identify the levers; they do not tell you how many times to pull them.
- Magenta workstation: the station highlight helps you find where to process a potion. When the alembic or agitator turns green, Highlight quick-action events is showing its brief speedup window. The clips below show the change and the extra click.
- Green plant in a corner: Highlight DigWeed marks a harvestable plant. Notify DigWeed can also alert you to its spawn. Pick it, then use the herb on a potion yourself.
Those are the colours used in this recording; station, quick-action and Digweed colours can be changed in the plugin settings. The blue square around the player and the red cursor are separate visual aids in this client setup. They are not timing cues you need to copy.
For a reward grind, the resin bars are especially useful: they show which colour still needs work. Display resin amount can also add your total earned resin to the HUD. Keep that separate from the hopper’s paste counts when checking supplies.
The recipes, workstation actions and batch bonuses are part of the game. The plugin adds labels and highlights; you still choose which orders to make and perform the clicks. You can follow the same loop on the standard client using the order icons, machine animations and sounds.
03 / Brew your first batch
Read the potion name, then follow the workstation icon
Each letter in the potion name represents 10 paste:
- M
- Mox
- A
- Aga
- L
- Lye


Choose the base with the levers
For Mystic mana amalgam (MMA), pull Mox twice and Aga once. The two purple blobs and one green blob in the picture show those three inputs. Collect the base from the mixing vessel in front of the levers; this costs 20 Mox and 10 Aga paste.
The lever order does not matter: MMA, MAM and AMM make the same base. If you make a mistake, each extra pull replaces the oldest input. Check the three blobs and correct the mix before collecting it. Paste is spent when you take the base, not when you pull a lever.
At 81 Herblore, MixALot (MAL) uses one of each: 10 Mox, 10 Aga and 10 Lye. Collect a separate potion for each order you plan to complete.
Match the station, then learn its speedup
Read the icon beside each request. Two orders can ask for the same base at different stations, so the recipe code alone is not enough. Left-clicking a station uses the first unfinished potion in your inventory, even if it is wrong for that order. Arrange your bottles in processing order, or use each specific potion on its requested station.
Finish potions that need the same station together to avoid walking back and forth. When you need all three stations, a useful route is alembic, retort, agitator, then the conveyor belt.
You can let each station finish normally on your first round. Then add these extra clicks to speed up the same process.
Alembic · Crystallise
Start the potion, then count the bellows opening. Click again as it fully opens for the fourth time. A successful click gives 14 extra XP and cuts the processing time by about a third.
The plugin turns the station green for this click. Without it, watch the bellows. An early or late click sets progress back, so count the openings rather than repeatedly clicking.
Retort · Concentrate
Start concentrating, then click the retort once per game tick: a steady rhythm of roughly one click every 0.6 seconds. Successful extra clicks give 2 XP each and can halve the processing time.
This is a repeated rhythm, unlike the single timed click at the alembic. The small XP drops help you tell whether your clicks are landing.
Agitator · Homogenise
Start the potion and watch for the early splash and sound cue. Click during that brief window for 14 extra XP and a jump in progress. The green outline in the clip is the plugin drawing your attention to that cue.
Once you can hit it consistently, click again on the following game tick, still within the two-tick window, for another progress boost and 2 XP. That means two timed clicks, not an instant double-click. Mistimed clicks can delay the potion.
Finish the batch before using the belt
When all the potions you intend to submit are processed, click the conveyor belt. A hand-in replaces the whole order list. If you submit one potion while still working on the other two, those old requests disappear.
Two correct orders submitted together give 20% more resin per potion; three give 40% more. In the picture, both MMA orders are finished, even though they needed different processing stations.
Make all three while learning. The “done” labels are a useful final check with the plugin; on the standard client, check that each finished potion matches both the requested base and processing type.
After handing in, read the new list and start again. Do not assume a recipe will need the same workstation next round.

Recipe reference
These are the base XP awards. Digweed and workstation speedups add to them.
| Code | Level | Base XP | Paste input |
|---|---|---|---|
| AAA | 60 | 190 | Aga + Aga + Aga |
| MMM | 60 | 190 | Mox + Mox + Mox |
| LLL | 60 | 190 | Lye + Lye + Lye |
| MMA | 63 | 215 | Mox + Mox + Aga |
| MML | 66 | 240 | Mox + Mox + Lye |
| AAM | 69 | 265 | Aga + Aga + Mox |
| ALA | 72 | 290 | Aga + Lye + Aga |
| MLL | 75 | 315 | Mox + Lye + Lye |
| ALL | 78 | 340 | Aga + Lye + Lye |
| MAL | 81 | 365 | Mox + Aga + Lye |
04 / A bonus worth picking up
Use Digweed on a valuable potion
Digweed occasionally matures in a corner of the workroom. Pick it when it appears; the plugin’s Highlight DigWeed setting adds the green outline shown here. Without the plugin, watch the corners and the in-game maturity message.
Use the herb on a potion to double that potion’s XP and resin. You can add it before or after processing. At 81, use it on MixALot for a strong return in all three resin colours. Below 81, use your highest-XP available recipe.

Click Digweed, then the MixALot bottle
In this clip, MixALot is already processed and capped. Select Use on the Digweed, then click that bottle. The herb disappears from its inventory slot when it has been added. The MAL label is the plugin’s recipe tag; you do not need the plugin to use the herb.
Hand the improved potion in with its matching order as usual. You can still submit it alongside the other two orders for the batch resin bonus. Add only one Digweed to each potion.
If MAL is not currently ordered, add the Digweed to a spare MAL base and save that bottle. Leave it unprocessed so you can use whichever station a later MAL order requests. Use the herb before a bank trip: loose Digweed withers when you leave the workroom, but a potion you have already improved can be kept.
05 / Choose what you are saving
Start with all three orders
“Maximum points” needs a little context. Resin per hour, resin per paste and the fastest way to finish one reward can favour different orders. The normal three-order loop above is a useful starting point; choose a more selective method once you know which of those matters to you.
Complete all three
Make the three requested potions and submit them together. You get the full batch bonus, practise every station and spend less time deciding what to skip.
Watch the resin bars
Check the colour furthest from your reward’s requirement. Completing more orders that award that colour can finish the unlock sooner, even if it gives less total resin. Use the individual bars, not just the overall percentage.
Get more from your paste
At 81, favour batches containing MixALot and avoid low-value single-colour potions when it is absent. Use the decision table below to choose each batch.
Saving paste at level 81 and above
| Current orders | What to make | Why |
|---|---|---|
| At least one MAL | All three orders | Apply the full batch bonus to MixALot, even if its companions are single-colour recipes. |
| No MAL, but some two-colour recipes | The two-colour recipes together | Skip AAA, MMM and LLL to save paste for stronger returns. |
| Only AAA, MMM or LLL | One order in the colour you need most | Refresh the list with a small paste spend. If the colour is the same, choose the station you finish fastest. |
Here, “two-colour” means a recipe such as MMA or ALL. MAL uses all three colours. Every potion still takes three lever inputs and 30 paste. For example, MAL + AAA + MMM is an all-three hand-in for this paste-saving strategy; without MAL, MMA + ALL + AAA means make MMA and ALL.
This table is for resin per paste. A method aimed at maximum resin per hour can skip different orders to spend less time at the stations.
When XP is the priority
For faster XP, prepare a stock of finished potions ahead of the order list. That lets you hand in several times before another lap of the stations, but gives you less control over resin colours and batch bonuses. Learn the normal loop and speedups first, then try this level-81 setup:
- Prepare three sets of seven bases: MMA, MML, AAM, ALA, MLL, ALL and MAL. That uses 21 inventory slots. Keep each set together and use spare space for the current orders.
- Process one set at each station. For example, crystallise the first seven, concentrate the next seven and homogenise the last seven. Use any extra current-order potions on their correct station before moving on. Check the bottle caps to separate finished stock from bases.
- Return to the belt and submit matches. Read each replacement list and submit again while your finished stock can satisfy it. You are using up prepared matches, so do not wait to make every hand-in a full three-order batch.
- When no stocked potion matches, refill the gaps with the same bases and prepare the new current orders. Repeat the station lap, processing only the unfinished bottles.
The extra inventory management is where this method takes practice. Our clips demonstrate the normal reward loop and station clicks; they do not show this pre-mixed XP inventory.
Expected rates
Passively refining roughly 2,750 herbs. Active clicking can nearly double the refining speed.
Depends on workstation speedups and execution.
Uses pre-mixing and aggressive order refreshing.
06 / Best herbs for mains
Buy the cheapest paste, not the cheapest herb
Every herb produces a different amount of paste. A cheap herb can still be poor value if it gives very little. Compare GP per paste separately for Mox, Aga and Lye.
Main accounts
Buy the cheapest paste, not the cheapest herb
Every herb produces a different amount of paste. These figures use the instant-buy price of the clean herb and compare each paste colour separately.
MoxMarrentill is cheapest now MarrentillMoxPaste/herb13231 GP17.77
 TarrominMoxPaste/herb15269 GP17.93
 HarralanderMoxPaste/herb20378 GP18.90
 Guam leafMoxPaste/herb10269 GP26.90AgaLantadyme is cheapest now
 LantadymeAgaPaste/herb401,249 GP31.23
 Dwarf weedAgaPaste/herb421,388 GP33.05
 Irit leafAgaPaste/herb301,599 GP53.30
 CadantineAgaPaste/herb342,316 GP68.12
 TorstolAgaPaste/herb443,168 GP72.00
 HuascaAgaPaste/herb205,863 GP293.15LyeAvantoe is cheapest now
 AvantoeLyePaste/herb301,571 GP52.37
 ToadflaxLyePaste/herb322,211 GP69.09
 KwuarmLyePaste/herb332,283 GP69.18
 SnapdragonLyePaste/herb407,638 GP190.95
 Ranarr weedLyePaste/herb265,842 GP224.69
Prices can move between batches. The cheapest row is recalculated from the same 5-minute Grand Exchange snapshot and one-hour fallback used by the Herblore Calculator.
Prices can change independently. Buy enough for one session and check again before the next large batch.
Normal potion making may still be faster or cheaper for your goal. Use the Herblore Calculator before buying a large stack.
07 / Best herbs for irons
Use spare herbs and keep the potions you will need later
Grand Exchange price does not matter on an Iron. Start with herbs you have plenty of, then keep a reserve for the potions your account still uses.
Our default herb choices
Use lower-tier herbs first
Harralander gives the most Mox per herb. Keep some for energy potions if those still supply your run energy; they use easy-to-buy chocolate dust. Also reserve harralander for goading potions if you use them on Slayer: Aldarium turns it into a potion that draws nearby monsters to you, including creatures that are normally unaggressive. Beyond those needs, spare harralander is an easy choice.
Guam, marrentill and tarromin make basic attack, antipoison and strength potions. Keep a small useful stack while those are your best options. Later, their lower-tier potions rarely justify keeping a whole bank tab of herbs, so use the surplus here.
Start with irit, then check your secondaries
Irit makes super attacks with eye of newt, which you can buy in packs. It is easy normal Herblore XP as well as a good paste supply: make the melee boosts you need, then use spare irit.
Cadantine makes super defence with white berries; dwarf weed makes ranging potions with wines of Zamorak. Both give useful combat supplies, but wines in particular can take time to gather. A large herb stack with very few secondaries is a reason to use some for paste, provided you leave enough for your next potion batch.
Keep huasca for prayer regeneration potions: they restore Prayer gradually during long Slayer and boss trips. Their secondary, Aldarium, also costs Mixology resin. Torstol combines your super attack, strength and defence potions into space-saving super combats. Lantadyme makes antifires with dragon scale dust, so reserve it for dragon content where you need fire protection. Magic potions are another use, but usually a smaller supply need.
Keep the supplies that would stop your next grind
- Ranarr → prayer potions. These keep protection and offensive prayers running on Slayer tasks and at bosses. Snape grass can be farmed at 61 Farming; a shortage today does not make your ranarrs disposable.
- Snapdragon → super restores. They restore Prayer and lowered combat stats, including the stats lost when drinking Saradomin brews. Keep both the herbs and a red spiders’ egg supply for that pairing.
- Toadflax → Saradomin brews. Brews pack a lot of healing into one inventory slot for bosses and raids. Crushed bird nests are the other half of the recipe, so birdhouse runs make your stored toadflax more useful.
- Avantoe → super energy → stamina. Super energies restore run energy immediately; amylase from rooftop marks upgrades them into staminas, which also reduce energy drain. Keep avantoe for questing, running-heavy bosses and methods such as Herbiboar. Mort myre fungus is the secondary for the first step.
- Kwuarm → super strength. Limpwurt roots turn it into a melee boost, also needed later for super combats. Grow limpwurts alongside your herb runs and reserve enough kwuarm to keep that supply moving.
This is a default, not a ban. A late-game account with thousands of spare herbs should use its bank, not follow a generic preserve list forever.
Check the Ironman potion and secondary table if a missing ingredient is holding you back. Herbs become paste permanently; refine for the next reward, then reassess your bank.
Do not aim for an even 1:1:1 paste stack. Start with the herbs you can actually spare and make more of a colour when your next reward shows you need it.
08 / XP per herb
Which herbs give the most Mixology XP?
Herbs produce different amounts of paste, and the XP from that paste depends on the potions you make. This comparison runs from single-colour potions (MMM, AAA or LLL) to MixALot at level 81, with every potion handed in for a matching order.
The figures include 6 XP for refining each herb and a fixed 14 XP per potion from a workstation speedup. They exclude Digweed. Your actual XP per herb changes with the recipes and speedups you use; these are comparison figures, not the lowest and highest possible returns.
Mox paste
Guam leaf74–132.3Guam tarMarrentill94.4–170.2Marrentill tarTarromin108–195.5Tarromin tarHarralander142–258.7Energy potionAga paste
Irit leaf210–385Super attackHuasca142–258.7Prayer regenerationCadantine237.2–435.5Super defenceLantadyme278–511.3Antifire potionDwarf weed291.6–536.6Ranging potionTorstol305.2–561.9Super combat potionLye paste
Ranarr weed182.8–334.5Prayer potionToadflax223.6–410.3Saradomin brewAvantoe210–385Super energy / staminaKwuarm230.4–422.9Super strengthSnapdragon278–511.3Super restorePaste colour alone does not tell you the XP from one herb. Torstol gives 44 Aga paste, while Avantoe gives 30 Lye, so Torstol has the larger return in this comparison. That does not make it the better purchase: compare current GP per paste, and keep herbs you need for useful potions on an Ironman.
For example, one Avantoe supplies the 30 Lye paste for a Liplack liquor: 190 XP for the matching order, plus 14 for processing and 6 for refining, gives 210 XP. Using Digweed adds a bonus to the potion you choose.
09 / Best Mastering Mixology rewards
Recommended reward order
Choose Rewards on Supervisor Lalo, just outside the workroom in the basement, to open the shop. Each purchase spends all three listed resin amounts. You keep your earned resin between visits, so there is no need to finish an unlock in one session.
Every reward costs a different amount of Mox, Aga and Lye resin. Check the table before you start skipping orders. If one colour falls behind, prioritise orders that award that resin.
Main account order
- Prescription gogglesSave eligible secondary ingredients and reduce the cost of future potion batches.
- Alchemist's amuletAdds extra doses to eligible potions and is strongest when the finished potion is valuable.
- Reagent pouchAllows much longer potion-making inventories and reduces banking.
- Potion storageUseful bank-space and decanting convenience, but it does not improve XP or supplies.
Move Potion storage earlier if bank space is already a problem. The chugging barrel and Aldarium are tradeable, so a main can buy them from the Grand Exchange instead of grinding the resin personally. Buy cosmetics only for the collection log or appearance.
Ironman order
- Prescription gogglesThe best first unlock because they save secondaries for the rest of the account.
- Alchemist's amuletExtra doses are especially useful for expensive or slow-to-replace supplies.
- Potion storageStrong bank-space and potion-management quality of life.
- Reagent pouchUseful for larger potion inventories and gathering some secondaries, but it is expensive and does not create more supplies.
Swap Potion storage and the reagent pouch if longer potion inventories matter more than bank space. Ultimate Ironmen cannot buy Potion storage.
Buy Aldarium whenever you need prayer regeneration or goading potions. Leave the chugging barrel and cosmetics until the permanent Herblore upgrades are finished.
| Reward | Mox | Aga | Lye | What it changes |
|---|---|---|---|---|
| Prescription goggles | 8,600 | 7,000 | 9,350 | Save eligible secondaries while making normal potions. |
| Alchemist's amulet | 6,900 | 5,650 | 7,400 | Increase the extra-dose chance on eligible potions to 15%. |
| Potion storage | 7,750 | 6,300 | 8,950 | Free bank slots and withdraw selected doses. Not available to Ultimate Ironmen. |
| Reagent pouch | 13,800 | 11,200 | 15,100 | Carry 26 of each supported secondary. |
| Chugging barrel | 17,250 | 14,000 | 18,600 | Combine up to five banked potion effects for repeated PvM preparation. |
| Aldarium | 80 | 60 | 90 | Tradeable ingredient for goading and prayer regeneration potions. |
How long do the rewards take?
Use roughly 3,000 Mox, Aga and Lye resin per hour as the level-81 reference. Your actual time changes with skipped orders, mistakes, Digweed and how evenly the three resin colours come in.
Main account, cumulative
| Reward reached | Approximate total time |
|---|---|
| Prescription goggles | 3.1 hours |
| + Alchemist's amulet | 5.6 hours |
| + Reagent pouch | 10.6 hours |
| + Potion storage | 13.6 hours |
Ironman, cumulative
| Reward reached | Approximate total time |
|---|---|
| Prescription goggles | 3.1 hours |
| + Alchemist's amulet | 5.6 hours |
| + Potion storage | 8.6 hours |
| + Reagent pouch | 13.6 hours |
Bought on its own from zero resin, Potion storage takes about 3 hours, the reagent pouch about 5 hours and the chugging barrel about 6.2 hours at the same reference rate.
10 / Training for profit
Make money while training Herblore
Read the Aldarium money-making guide and use the profit calculator to enter your own Mox, Aga and Lye rates, paste costs and preparation time. It also covers choosing Lye orders below level 81.
Once you have the permanent rewards you want, spend resin on Aldarium or a chugging barrel to sell. You still earn Herblore XP from the orders. For a main who prefers playing an activity to mixing potions at a bank, the sale can pay for the herbs and leave a profit.
Choose what you will sell before filling the hopper
Aldarium sells in small units and lets you cash out regularly. A barrel needs a much larger resin stack, roughly six hours at the reference pace below, and must be disassembled into its tradeable form. Its price can change while you earn it. Compare both against the cost of replacing your paste, even if the herbs are already in your bank.
- Compare the current net return below. Check which resin colour limits each reward. A large surplus of the other two does not buy another barrel or Aldarium by itself.
- Buy or refine a small batch. The herb comparison finds cheap paste by colour. Test the buy price before committing to a long session.
- Train toward the reward’s resin balance. Complete all three orders while learning, use Digweed on MixALot when available, and favour your short colour when choosing which orders to make.
- Check the actual sale price before buying more supplies. Treat the comparison as a current estimate. Your own full-session resin rate, including preparation, gives a better time budget than a perfect stretch of orders.
The paste-saving strategy stretches herbs, but is not automatically the most profitable use of an hour. Likewise, the pre-mixed XP strategy targets XP rather than resin income. Start with the normal order loop and measure the return before trying to optimise it.
Live reward comparison
Aldarium or a disassembled barrel?
- Paste used
- 2,000 of each colour/hr
- Resin earned
- 3,000 of each colour/hr
- Grand Exchange tax
- 2%
Net GP per hour subtracts the estimated clean-herb cost above. The result is a market estimate, not guaranteed profit.
For an Iron: the tradeable sale comparison is not the reason to play. Aldarium supplies your own prayer regeneration and goading potions; goggles and the amulet improve future potion batches. Keep earning XP while working toward those supplies.
Start with the goggles, then train around your account
If you only want the most useful permanent upgrade, get Prescription goggles first. Continue for the amulet and the other rewards when their benefit is worth more to you than returning to normal Herblore.